
WHAT IS A PIGMENT TRANSFER?
A pigment transfer is a print-based process in which acrylic paint is used to lift the pigment from a photocopied image and embed it into a new surface. The original image is removed through water and abrasion, leaving behind a singular transfer shaped by material variables and physical intervention. Although derived from printmaking, each pigment transfer results in a unique, one-of-a-kind work.
THE PIGMENT TRANSFER PROCESS
The pigment transfer works are created through a hybrid process that sits between drawing, painting, and printmaking. Rather than functioning as a reproducible print method, the transfer is used as a starting point—one that introduces instability, interruption, and material variance into the image.
Images are sourced from archival material, personal photographs, and satellite imagery, often already carrying traces of time, distance, or distortion. These images are first translated into a pigment-based form and then transferred onto paper or panel through a physical process that is deliberately imperfect. Pressure, moisture, and surface resistance all play a role in how much of the image adheres and how much is lost.
The transfer itself is only one stage. Once the image has been partially embedded into the surface, it is worked back into through drawing, erasure, abrasion, and repainting. Portions of the transferred image may remain intact, while others break down, shift, or disappear entirely. The result is not a fixed reproduction, but a singular object shaped by both intention and chance.
Because the transfer process resists total control, each work carries subtle differences—variations in density, clarity, and edge that cannot be repeated. Ghosting, misalignment, and surface disruption are not corrected but embraced, reinforcing the sense of fragmentation and instability that runs throughout the work.
The use of transfer is conceptually tied to ideas of memory, mediation, and distance. Images arrive already filtered—through technology, time, or context—and the physical act of transferring mirrors that condition. What remains is incomplete, altered, and subjective, allowing the work to exist in a space between documentation and reconstruction.
Although the process draws from printmaking traditions, the finished works are unique originals. The transfer does not function as an editioned matrix, and no two works originate from the same physical source. Each piece resolves through direct engagement with the surface, emphasizing material presence and the evidence of touch.
This process allows the work to retain a sense of history while remaining unsettled—images that feel familiar but unstable, anchored yet continually shifting.
MATERIALS
Acrylic Paint - We use Utrecht brand Gesso and Acrylic Matte Gel Medium. You may use an acrylic medium, preferably a thick gel medium, but you may also use gesso, as well as any colored acrylic paint.
Photocopy with the Mirror Image of Your Original - as the process reverses the image, be sure to mirror your image at or before the printers
The Transfer Surface - any flat surface that will take acrylic paint, such as canvas, paper or wood
Paint Brush, Foam Brush, etc. - paint application
Spray Bottle - needed for the paper removal
2-3 Inch Plastic Bristle Scrub Brush - in the cleaning section of your grocery store
Fan - necessary to control moisture during drying
A Flat Surface - either a wall to attach the transfer to while drying or plywood cut to the exact size of the stretcher (we stretch our canvas onto plywood during the transfer process)
Staple Gun or Tape - any means of attaching your material to a flat surface
Cotton Rag - we use old white t-shirts
Primer - gesso or acrylic medium to prime the transfer surface,
Screen Printing Squeegee - makes the actual transfer a lot more consistent, though you can use your hand if without
Scissors or X-Acto - anything to cut excess paper
STEP-BY-STEP
The following method outlines how to transfer pigment from paper to any surface that takes acrylic paint. The process is designed for transferring the pigment from black and white or color photocopies, but can also be used on graphite, ink, computer prints, magazines, and a variety of other printed material, with varying results.
These steps are intended to create the most accurate transfers possible. There are a number of variables that can be adjusted or completely ignored to create a more weathered result. Once you have an understanding of the process, you can then start making adjustments to suit your desired outcome.
1. Begin with a standard black & white or color photocopy, on plain paper. Ink jet prints will work, but about 50% of the ink will come off as you scrub, resulting in a fainter image. Make sure there is about an inch or more of extra paper on each side of the image.
2. Staple the photocopy, print surface up, to a flat surface. This controls the expanding and shrinking process the paper goes through while wet and drying.
3. Paint 3 layers of acrylic medium onto the print surface of the photocopy. Allow each layer to completely dry before applying the next. Speed up the drying process by using a fan and heat if cold. The two ingredients for fast drying acrylic paint is warm, moving air.
You can completely avoid this step and transfer the original photocopy to your surface. The layers of acrylic medium helps create a more reliable, precise transfer. The layers of dried medium make it less likely any air bubbles will tear off while removing the paper. It also makes the paper less likely to warp or ripple while drying.

The mirror image of the transfer image stapled to the wall. It is a color photocopy on 11 x 17 paper. The paper we use exclusively now is Utrecht American Masters 250 GSM (Natural color, which is a warm off white). A somewhat heavy paper is necessary, around the weight of card stock. Both pieces of paper have 3 layers of acrylic medium.
4. While the layers of medium are drying, prepare your transfer surface. If the surface is receptive of acrylic paint, either gesso or acrylic medium. The white in the photocopy is the white of the paper, so an initial white surface will recreate this. As for paper, use a larger sheet that you will eventually cut down (we often do multiple transfers on a large piece of paper).
5. Now, you are about to attach your image to your transfer surface. If using canvas, either attach the canvas to a wall or table (unstretched) or build a plywood surface the size of your actual stretcher and stretch the canvas to this surface. We use this method because the work to be mobile during the transfer process. If transferring to paper, have the large piece of paper either attached to a wall or a flat mobile surface.
6. Paint one final layer to your transfer surface and photocopy. While still wet, place your image on your transfer surface and align the edges. Gently apply pressure and move from the center of the image to the edges, forming a strong bond between the transfer surface and the photocopy, as well as removing as many air bubbles as possible. Only work the air bubble out in one direction, either horizontally or vertically across the surface of the paper. Be gentle, you can tear or distort the paper as your are pushing the air bubbles out, especially if the paper is wet or if there is humidity. You can use your hands, but we always use a screen-print squeegee for the most uniform results. On large transfers of over 20 inches, the squeegee is essential. You can also remove air bubbles by taking an x-acto knife, cutting a small 1/4 inch slit in the middle of the air bubble, and pushing the air out the small hole. Often times, while removing air bubbles, several will connect and form a large air bubble, which is a good time to use the x-acto knife. If you are transferring to paper, attach the paper to a wall once the air bubbles are removed. This keeps the paper from wrinkling during the drying process.

A smooth surface to attach the two pieces of paper. A layer of acrylic medium is painted onto the paper and the photocopy is placed face down. The air bubbles are removed with the squeegee. Once this is finished, reattach the image to the wall to dry.
7. Let the paint completely dry. The transfer will dry quicker in hot, dry environments and slowest in cold and/or humid environments. You will be able to feel moisture on the back of the photocopy paper, as well as feel the softness of the drying paint when the transfer is still wet. A full day is a safe dry time. Be sure to use a fan while drying the transfer. This keeps the paper from wrinkling during the drying time.
8. Once the transfer is dry, take a spray water bottle and wet the paper. Take any type of stiff-bristle brush. We use a plastic brush that is about 4 inches long, has a handle, and 2-3 inch plastic bristles.

This is the image after it has dried for 24 hours. It has been sprayed with the water bottle, about to be scrubbed with the brush.
9. Scrub the wet paper. This is why you need a resistant surface, you simply can't do this step on a stretched canvas. You begin with heavy scrubbing and, as you remove the layers, begin scrubbing more delicately. Scrub a layer, wipe off the loose paper, spray, scrub again, wipe off, spray paper, take an old t-shirt and get the small particles left behind. Finally, just barely wet the paper and use your fingers to get any tiny bits of paper left behind.
Note: You can remove the pigment while scrubbing the paper. You may want this, it creates a weathered effect. Also, if there is still moisture in the paper, the pigment will scrub off easier, so for instance if it is humid or if you have perhaps let the transfer only dry for several hours, there may still be moisture. Just be careful while scrubbing. Or, if you want the weathered effect, then take advantage of this.

Scrub with the brush, to get rid of the thick paper. This is the hardest scrubbing. You will be removing big pieces of paper. Keep your brush wet, either by spraying the paper or by dipping the brush into a bucket of water.
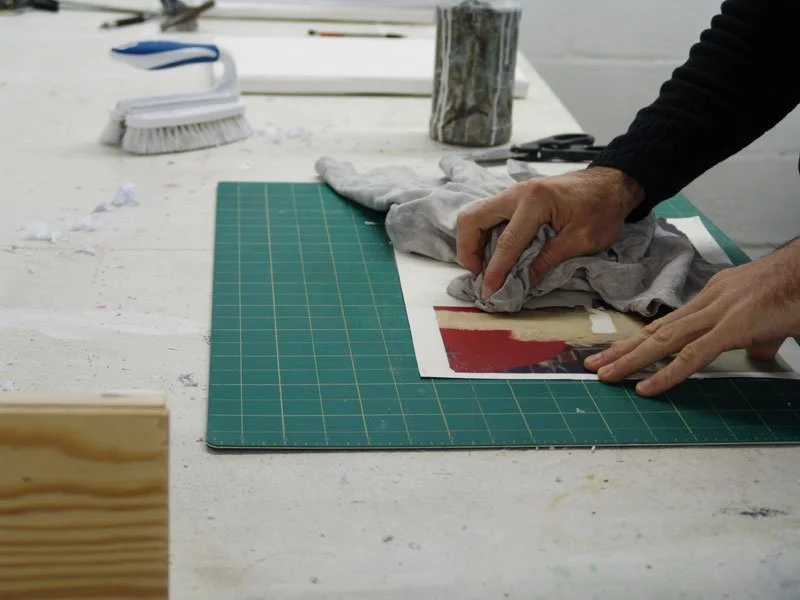
This is the more delicate part of the transfer, removing the smaller pieces of paper. Old cotton t-shirts work very well.

Use the t-shirt to dry the paper (you don't want it completely dry, wipe up all the standing water) and remove the very fine pieces of paper with your fingers. You can see the remaining bits of paper, but most importantly, you can feel it with your fingers. The removal process for a transfer this size on paper takes about 15-20 minutes.